How to Draw an Isometric Village
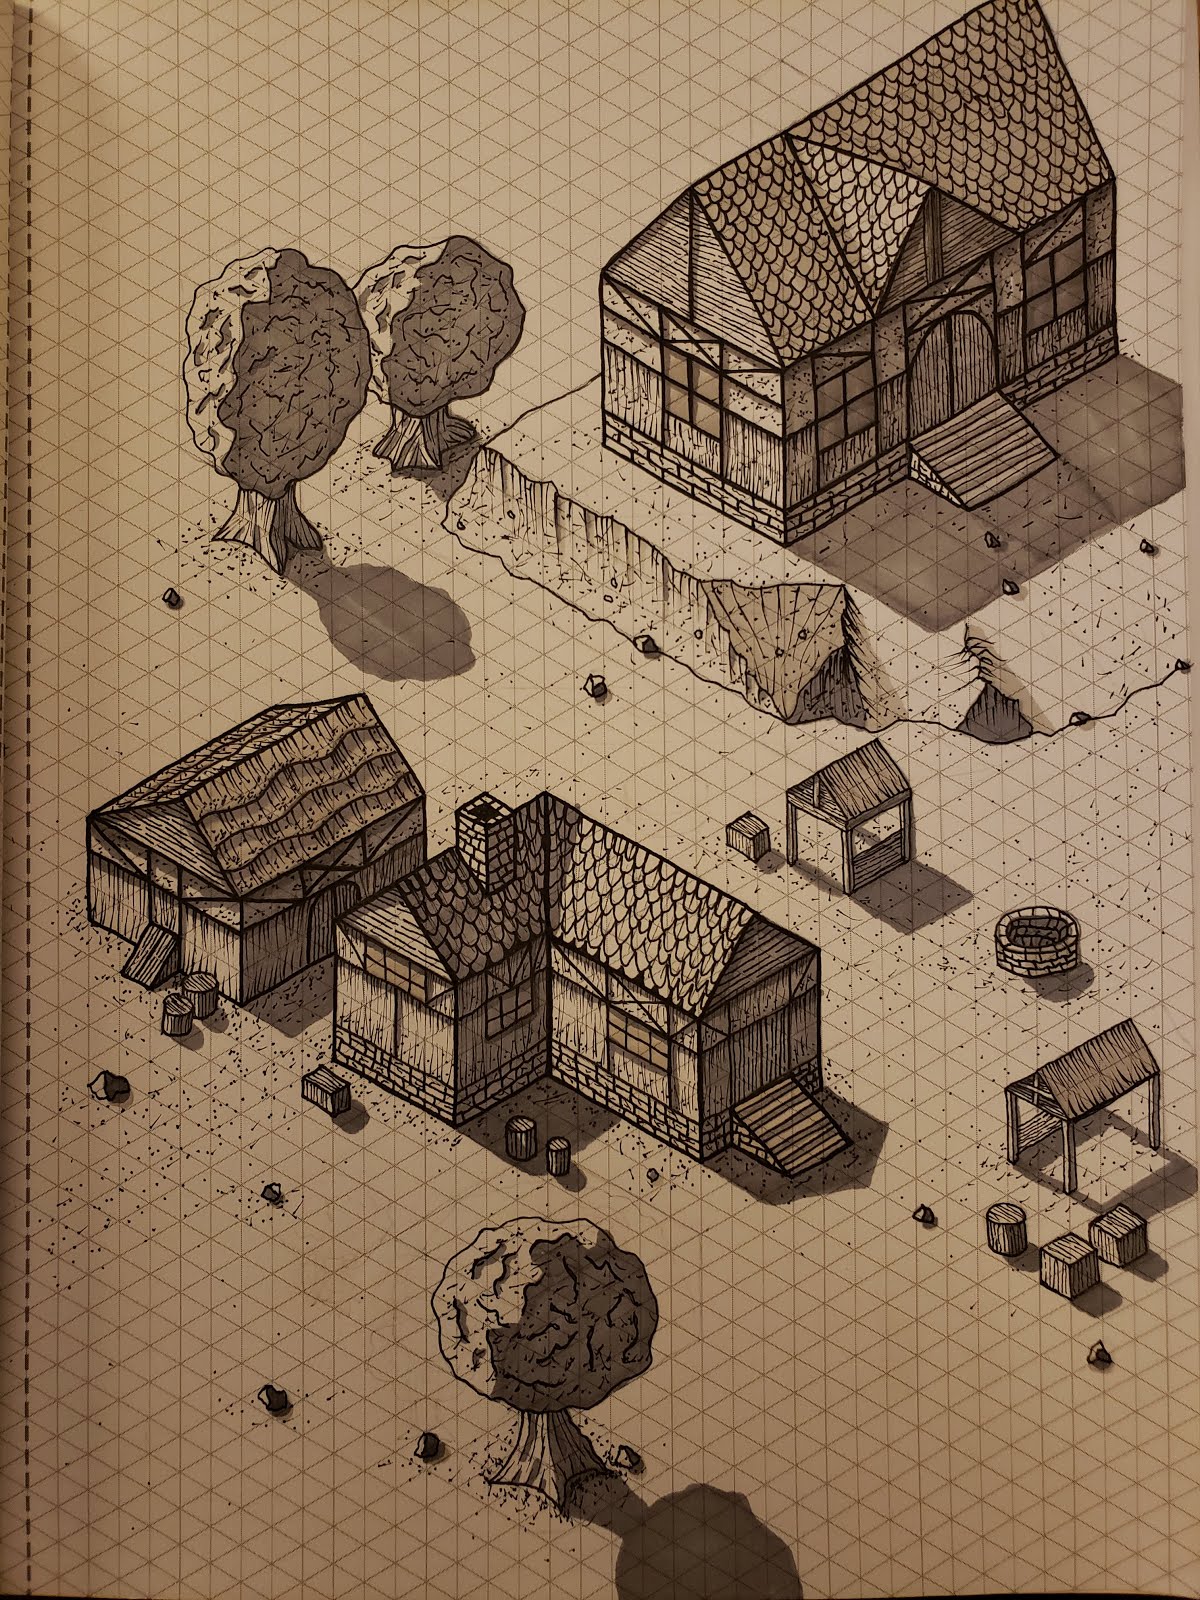
I continued my isometric drawing craze, this time experimenting with drawing a village. As you can see a few buildings and some natural features can really make an isometric perspective drawing pop. In this post I'll show you how to draw a house like the one in the picture above. In follow up posts I will bring it together with tree's, streams, cliffs, and other structures.
Supplies
We will need the 05 and 005 pens and Cool Grey 1-4 markers. All of these materials are available at the links above.
Step 1: Pencil Outline
To start draw a pencil outline of the shape, making sure to trust the isometric paper's lines. In this step you can feel free to experiment and erase as much as needed. Once you are done go ahead and erase any lines that would be covered up by other features. For example the bottom of the right most wall is partially covered by the steps. I erased this portion of that line so that I would not accidentally use the marker on that section.

Step 2: Pencil Details
No go ahead and add details for the walls and windows. This is where you can give the building some character. I am going with a classic medieval look with externally facing wall posts at various angles. I then added cross bars to each window.

Step 3: Trace with a Pen
Now go ahead and trace the building with a .005 micron pen. This is where you make the final decisions on what the structure will look like. Make sure that you do not draw over any pencil lines that should be covered up based on the perspective.

Step 4: Erase Pencil Lines
This step is easy. Go ahead and just erase the pencil marks. Do not worry about fading the marker lines as we are going to go back over these.

Step 5: Darken Lines
No go ahead trace over the lines with the .05 pen. If any of the lines are unnaturally wavy with is a good opportunity to be careful and make the lines straight.

Step 6: Brick Detail
Using the .005 pen draw the horizontal lines first and then alternate each row of the bricks.

Step 7: Door Texture
Using the .005 pen add in the texture for the door. Try not to apply too much pressure, allowing intermittent gaps in the vertical lines.


Step 8: Wall Texture
For the wall texture use the .005 pen. Press hard starting from the top of the wall section, and then "scratch" the paper with the pen in order to thin out the line as you draw it. Randomly have some sections with lots of lines and other with few lines. Then repeat the process starting from the bottom of the wall section.


Step 9: Side of Roof Texture
Again use the .005 marker. This step is very similar to the door except that the lines are horizontal.


Step 10: Top of Roof Texture
This step is time consuming and can be difficult to keep consistent shapes. However I would not worry about this, once they are all in place it will look good. Start from the top using the .005 pen and off set each row from the last.

Step 12: Finish Wall Texture
Add random dots and small scratches to the empty wall sections and the wall sections we already added texture to. Try to keep the dots and scratches light and random. I find it helpful to lift my hand off the paper and hold it with only two fingers. This makes it hard to be accurate, helping it look more random, and makes it easier to keep the detail from getting too thick.

Step 13: Initial Shading
Now use the Ice Grey 4 marker to shade in the bottom right wall sections of the building. Then extend the shadows of building onto the ground as shown.

Step 14: Windows
Now use the Ice Grey 1 marker to color in the windows. Then take the Ice Grey 3 marker and color in the bottom right of each window section in order to give the window a glassy look.


Step 15: Final Shading
Now use the Ice Grey 4 marker to shade along the right hand edge of each vertical wall beam, and the bottom edge of each horizontal wall beam. Finally use the Ice Grey 3 marker on the part of the roof that needs shaded.

And that's it! It does take some time, but with the right supplies and following these steps it is relatively easy to do. See my other How to Draw Isometric articles for more pop off the page isometric techniques.